migrating to a static blogging platform
I've always used self hosting platform for my various blogs that
I maintained during the years, the first one written using PHP
(oh boy) until the last one that was developed in Django.
Because maintaing a blog platform is time consuming and probably not worth doing, now I'm migrating to a static platform (i.e. Github's pages); a reason is that a complete blogging platform is overkilling: I need only one account and I don't need a database, a filesystem data storage is more than enough (morever now is a Github's problem the performance) and the Markdown syntax is the format I'm using the most in the last period: Indeed you can find a lot of stuffs under my gist's related pages and probably some of them will become a day a post here.
Consider also the cost of updating the infrastructure and avoid compromission from external entities; the backup is automatic and if some reader find a typo a pull request is welcome from the repository.
There are of course some aspect that I have to consider: for the comments I will use Disqus that allows me to make it indipendent from the platform itself (I know that this esposes my reader to external tracking but my advice is to use some not-track-me tecnology like Adblock plus). BTW not much people commented my posts :P
Another aspect is the SSL: i would like to serve the pages with a
secure connection; Github obviously doesn't have a proper certificate for
a domain owned by me, a solution could be using CloudFlare but this will
require to change the DNS servers that manage my domain and I'm not
ok with that.
So probably in the near future I will move the compiled pages to a server of mine
P.S: if you like me have a page that is at the top domain (not, you know, a www like subdomain)
you can encounter some problems with the DNS settings for other services
like email, in that case you must set a A entry in the DNS configuration,
not a CNAME one; in this page
are indicated the IP addresses to use.
Cookbook: deactivating scheduled object on error
Suppose we have an object that has a scheduled action on it (do you know celery?) and suppose that we are far-sighted people and we know that shit happens and we want to prevent disaster removing the object from the queue of the scheduler when an exception is raised.
We are using Django and our object has an attribute active that indicates
that it is available for scheduling; to manage the exception we add the attribute error that indicates an error happened on it (probably we could use a TextField and save also the
exception there but for now is enough); the attribute title is
here only to have a parameter
to query with the object later, substitute it with the fields that you want, it's
your life.
 class Object(models.Model):
    title  = models.CharField(max_length=100)

    active = models.BooleanField(default=False)
    error  = models.BooleanField(default=False)

    def deactivate(self, error=None):
        if error:
            self.error = True

        self.active = False
        self.save()
Suppose the celery task is the following
 @transaction.atomic
 def _manage_obj(pk, *args, **kwargs):
    obj = Object.objects.get(pk=pk)
    do_some_fantastic_action_on_it(obj)
the transaction.atomic decorator make possible to maintain the original state
of the object before the error occurred (also for this reason is necessary to deactivate
it because otherwise the next time the error will happen again 'cause determinism, you know?).
Instead of calling the method below we will use the following code: we call
the original method, wrapping it around a try and except block: if an
exception is raised we catch it, we retrieve the object on which the code failed,
we deactivate it indicating that there was an error (probably we should write a decorator here :))
 @app.task
 def manage_object(pk, *args, **kwargs):
    '''
    This method wraps the one managing the object.

    If an exception occurs during the inner method then deactivate
    the object and re-raise the exception so that celery manages it.

    The inner method should be atomic so that the object remains in the
    state it was when the error occurred.
    '''

    try:
        _manage_object(pk, *args, **kwargs)
    except:
        obj = Object.objects.get(pk=pk)
        # get the exception context to reuse later
        exc_info = sys.exc_info()

        obj.deactivate(error=exc_info[0])
        mail_admins('Object deactivate on error', u''''%s' deactivated bc an error occurred.
        ''' % obj.title)

        # reraise exception wo losing traceback
        # http://www.ianbicking.org/blog/2007/09/re-raising-exceptions.html
        raise exc_info[0], exc_info[1], exc_info[2]
Since the exception is re-raised, it will be catched by celery that will manage it
in the way is configured for; in order to not lose the original traceback the raise
line has a particular form that you can deduce from the raise
and the sys.exec_info() references.
Testing
Obviously the coding is nothin without testing: we need to use the mock library
to fake an exception and check that the final result is what we expect (you have to
set some django's settings in a particular way to make this works like in the
override_settings just below)
@override_settings(
    CELERY_ALWAYS_EAGER=True,
    CELERY_EAGER_PROPAGATES_EXCEPTIONS=True,
    BROKER_BACKEND='memory', # avoid error for missing redis
)
def test_gracefull_failing(self):
    obj = ObjectFactory()
    with mock.patch('my_app.models_tools._manage_object') as mocked_manage_object:
        class KebabException(ValueError):
            pass

        mocked_manage_object.side_effect = KebabException('Kebab is not in the house')

        try:
            manage_object(obj.pk)
        except KebabException as e:
            logger.info('test with ' + str(e))

    # refresh the instance
    obj = Object.objects.get(pk=obj.pk)

    # check something here
For now is all, bye.
Creating a linked instance in an add page
Suppose we have a model named Provider having a foreign key to an instance of
User needed in order to allow a human to login and do stuff in the backoffice.
 class Provider(models.Model):
    user = models.ForeignKey(settings.AUTH_USER_MODEL)
(settings.AUTH_USER_MODEL should be used to avoid rewriting a lot of code if you are using
a custom user model).
Suppose the backoffice has different access capabilities represented by different Group instances and the GROUP_ADMIN_NAME allow the user belonging to it to add instances
ofProviderand the instances of Provider need to have GROUP_PROVIDER_NAME attached to them.
Obviously attaching an user in the add form for the Provider is not a problem, Django
creates an UI to do that, but also without thinking about the problem involved allowing to
someone to create an user, attaching the correct group to the just created user can be
error prone and it's a good rule of thumb avoid human skills in order to make the system work.
Solution
The idea is to modify the add form in order to show two more fields, username and password
that will be used to create the given user after saving the initial model instance;
The implementation shown below simply create a custom form with that two fields and is
used only when the object is created but not changed. The correct configuration of
the user is done in the save_model() method of the ProviderAdmin class
(checking that the instance is added and not changed).
 class ProviderAdminFormAdd(forms.ModelForm):
    class Meta:
        exclude = [
            'user',
        ]

    username = forms.CharField()
    password = forms.CharField(widget=forms.widgets.PasswordInput)

 class ProviderAdmin(admin.ModelAdmin):
    readonly_fields = (
        'user', # this override the form's exclude attribute
    )
    def get_form(self, request, obj=None, **kwargs):
        if not obj:
            kwargs['form'] = ProviderAdminFormAdd
        return super(ProviderAdmin, self).get_form(request, obj, **kwargs)

    def save_model(self, request, obj, form, change):
        '''Link a just created user with the instance.'''
        if not change:
            user = settings.AUTH_USER_MODEL.objects.create_user(
                username=form.cleaned_data['username'],
                password=form.cleaned_data['password']
            )

            user.groups.add(Group.objects.get(name=GROUPS_PROVIDER_NAME))
            user.save()

            obj.user = user

        super(ProviderAdmin, self).save_model(request, obj, form, change)
In order to complete the implementation we need some testing (I like testing):
in the code just below we have two tests, in the first we are checking that
the page doesn't give an error when accessed (i.e. by a simple GET
request with a logged user) and the needed fields username and password
are present.
When a POST is done with the correct data then a new Provider instance
is created with an attached User to it.
The second test checks that the change interface doesn't have the added fields.
    def test_provider_add_with_user(self):
        n_users_start = User.objects.all().count()
        n_providers_start = Provider.objects.count()

        url = reverse('admin:deal_provider_add')
        self.assertEqual(True, self.client.login(username=self.amministratore.username, password='password'))

        # check accessing the page is ok
        response = self.client.get(url)
        n_providers_end = Provider.objects.all().count()
        self.assertEqual(response.status_code, 200)
        self.assertEqual(n_providers_end, n_providers_start)

        # it's not possible to retrieve the original class
        form = response.context['adminform']
        # so we check for fields
        self.assertTrue('username' in form.form.fields)
        self.assertTrue('password' in form.form.fields)

        # check empty form
        response = self.client.post(url)
        n_providers_end = Provider.objects.all().count()
        self.assertEqual(response.status_code, 200)
        self.assertEqual(n_providers_end, n_providers_start)

        form =  response.context['adminform']

        data = {
            'username':    'user-name',
            'password':    'password',
            '_save':       '',
        }
        response = self.client.post(url, data=data)
        n_users_end = User.objects.all().count()
        n_providers_end = Provider.objects.all().count()
        self.assertEqual(response.status_code, 302)
        self.assertEqual(n_providers_end, n_providers_start + 1)
        self.assertEqual(n_users_end, n_users_start + 1)

        # FIXME: check Group and login maybe and stuff

    def test_provider_change_is_normal(self):
        '''We don't want customization for the change form'''
        n_users_start = User.objects.all().count()
        n_providers_start = Provider.objects.count()

        url = reverse('admin:deal_provider_change', args=[1,])
        self.assertEqual(True, self.client.login(username=self.amministratore.username, password='password'))

        # check accessing the page is ok
        response = self.client.get(url)
        n_providers_end = Provider.objects.all().count()
        self.assertEqual(response.status_code, 200)
        self.assertEqual(n_providers_end, n_providers_start)

        # it's not possible to retrieve the original class
        form = response.context['adminform']
        # so we check for fields
        self.assertTrue('username' not in form.form.fields)
        self.assertTrue('password' not in form.form.fields)
Extra
Just for reference I add the flow of the internal implementation of Django
 self.add_view()
 '-> self.changeform_view(obj=None)
   '-> self.get_form()
   '-> self.save_form(form)
     '-> form.save(commit=False)
     '-> self.save_model()
     '-> self.save_related()
     '-> self.response_add()
Git statistic
Sometime I'm curious to know how many commits I have done in a repository of mine in order to make a graph with my activity or stuff like that; I searched in the interwebz but seems that an out-of-the-box program with a simple command line tool that outputs data to feed tools like gnuplot doesn't exist: I mean, it simple to make git outputs the commit, one for line with only the date
$ git log --format=%ci
2013-12-31 18:10:36 +0100
2013-12-31 18:10:36 +0100
2013-12-31 18:10:36 +0100
This data should be easy to feed gnuplot with, the only problem is if I want to aggregate data grouping by date, like a SQL query; how do that?
I just discovered a simple python command named q that allows to query a text stream with the same syntax of SQL
(under the hood it uses the sqlite3 database): the project is on github and describes itself as
q allows direct SQL-like queries on text files, including joins and any other
SQL construct, and supports automatic detection of column types and names.
Thank to it now I can do a thing like this
 $ git log --no-merges --format=%ct, \
    | q -d , "select strftime('%Y-%m-%d', DATETIME(c1,'unixepoch')) as day, count(*) from - group by day" -D " "
 2011-07-10 1
 2011-07-13 1
 2011-07-14 1
 2011-09-02 3
 2011-09-03 1
 2012-10-16 3
 2012-10-17 3
The DATETIME thing make the database parses correctly the date (note the %ct format string in git log that outputs the unix timestamp).
The final step is to pipe all the data to gnuplot in order to create a wonderful(?) plot
$ git log --no-merges --format=%ct, \
 | q -d , "select strftime('%Y-%m-%d', DATETIME(c1,'unixepoch')) as day, count(*) from - group by day" -D " " \
 | gnuplot -p -e 'set xdata time;set timefmt "%Y-%m-%d" ;set boxwidth 0.9;plot "-" using 1:2 with boxes'
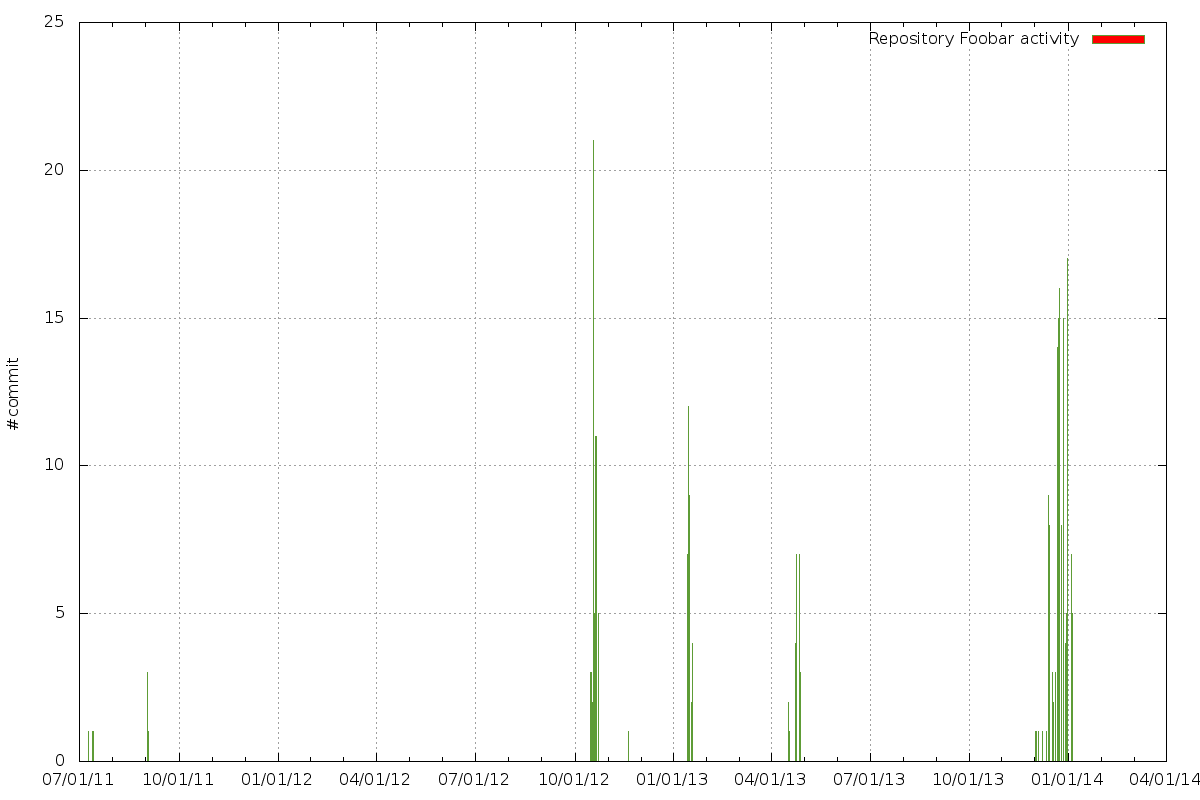
Making a graph with the activity of each author is left as exercise for the reader.
Mount a partition inside a disk image
This little trick can help you if retrieve contents from a dumped image is needed: let's suppose we have a file named dump.img obtained by dd if=/dev/sdd of=dump.img
After that you can mount it using a loop device, but in order to access a partition you need to indicate an offset (otherwise the mount command will refuse to mount it) that can be read from the output of the parted command:
 # parted dump.img -s unit b print
 Model:  (file)
 Disk /home/gipi/dump.img: 4022337024B
 Sector size (logical/physical): 512B/512B
 Partition Table: msdos

 Number  Start        End          Size         Type     File system  Flags
  1      1048576B     1050673151B  1049624576B  primary  fat32        boot
  2      1050673152B  4021288959B  2970615808B  primary
We are interested in the second partition, so the number to use is 1050673152:
# losetup --offset 1050673152 -f dump.img
In order to know the loop device to pass as argument to mount, losetup has a --all option
 # losetup --all
 /dev/loop0: [0823]:6685472 (/home/gipi/dump.img)
So finally we can mount the partition with
# mount /dev/loop0 /mnt/dump/
certificates, CA and startssl.com
Today knowing the technology on which our sites are built is serious business; a thing that you as informed developer must know is the PKI infrastructure that is the web of trust used in the modern internet to guarantee security in the communication.
Following Wikipedia, this is the definition:
A public-key infrastructure (PKI) is a set of hardware, software, people, policies, and procedures needed to create, manage, distribute, use, store, and revoke digital certificates.
Prelude
In order to understand how the PKI works we must do a step back and tell something about asymmetric cryptography: in this scheme you need two keys to communicate securely contents between parties; if Alice wants to send a message to Bob she uses his public key, encrypts the message and send to Bob. He using his private key can decrypt the message and access the original contents. As the name can make obvious, the public key is public, instead the private key must remain secret.
This works using some pretty awesome properties of prime numbers and in general factorization of integer numbers: indeed this scheme is considered computational secure, not informational secure in the sense that its security is based on a well know hard problem: factorize numbers. If tomorrow a magician could factorize instantaneously a 2048 bits numbers then this scheme will be useless.
The keys are exchangeable in their functionalities: if you use a private key to encrypt a message, you can use its public key to decrypt, because of this they are also useful to demonstrate the authenticity of a digital document: if Alice performs a checksum of her PhD thesis and using her private key encrypts this value, she can send it to Bob that can at this point use the Alice's public key to decrypt the checksum and compare with the checksum of the document in his hands. Bob then knows that the document belongs to Alice.
Asymmetric cryptography therefore can furnish authentication and confidentiality. If you want to give a try to this kind of cryptography, try pgp.
SSL, TSL and HTTPS
How are used all the crypto stuff in the interwebz? usually they are used by the
Secure Socket Layer (also known as Transport Layer Security) that
permits to encapsulate an insecure communication channel with a secure one. The
more used protocols have their secure version: http has https,
imap has imaps etc...
The protocol consists of two distinct phases:
- Handshake protocol: authenticate server to client, agree on cryptographic protocols and establish a session key
- Record protocol: secure communication using session key
although above we talked about asymmetric encryption, in order to do some crypto during communication, a simmetric cipher is used since is less expensive from a computational point of view: the asymmetric crypto is used in the handshake protocol only to authenticate and to exchange the session key.
Indeed is very important that you are sure you are communicating with the right server and not with someone else (since the evil villain would like to intercept the communication in the middle of the channel, this kind of attack is called man in the middle or mitm); in order to enforce the identity of the endpoint the PKI is used.
During the TLS's handshake the server send back to the client a certificate with some important informations (it's a little bit oversimplificated here)
- signature algorithm
- issuer
- subject
- public key
- signature value
the identity of the server is indicated by the subject field (here go things like domain name and email), the issuer field points to the authority that emitted the certificate and the remaining fields are cryptographic infos. The most important is the signature value: it's the checksum of the certificate data (signature excluded) signed with the private key of the issuer; in this way you are sure that the certification authority has really authorized it.
The verification of the identity works as follow: your browser reads the signature value and using the public key in the issuer's certificate verifies it, if they match then the browser verifies the issuer's certificate repeating the process just explained. It's obvious that in theory this process could continue endlessly but in the reality exists, embedded in your browser (mozilla, chromium), a certain numbers of certificates, called root certificates, that are self signed (i.e. are signed using its own private key verifiable with the public key in the same certificate). If during the verification process something breaks then the browser will present you with a message about untrusted transmission.

StartSSL.com
Who emits certificates is called certification authority and has its certificates in the browser as explained just above; they charge people that wants to have this certificates, but someone gives you certificates for free, it's startssl. If you don't need high profile certificates with subdomain and stuffs I advice you to give a try and in this case to follow the instructions below.
First of all you have to create a pair of public/private keys, in this case we are using openssl
$ openssl req -new -newkey rsa:2048 -keyout example.com -nodes -out example.com.csr
This generates the two keys (example.com and example.com.pub) and a
certificate signing request (example.com.csr): roughly speaking it's a
simple certificate without signature that we are going to submit to startssl in
order to have signed with their private key. First of all you have to register,
download the certificate that allows you to authenticate to their services and
then access the web panel and the certificate wizard tab as shown in the
following screenshot

After selecting the Web Server SSL/TLS Certificate from the menu you should
see a page where it asks you to generate a private key.
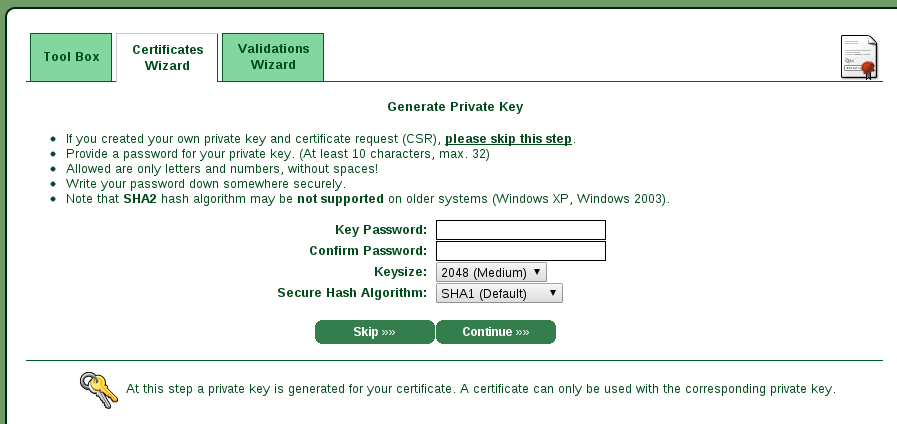
Since we have generate our with openssl we can skip this step and copy the
certificate signing request in the next page.
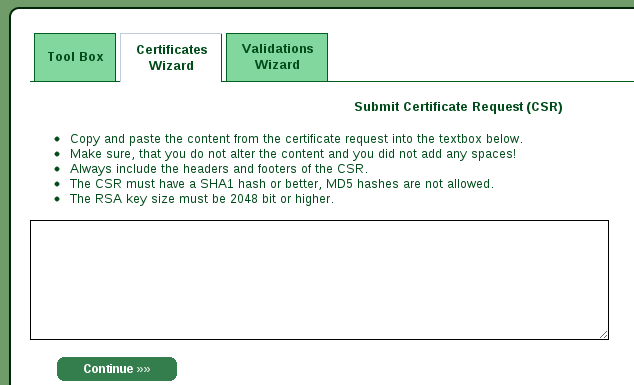
If you have already generated your key you can use instead the following command
$ openssl req -new -key example.com -out example.com.csr
After insert the content of the textarea and submitted you will receive your signed certificate (I skipped two intermediate pages but are not critical for the process explained here).
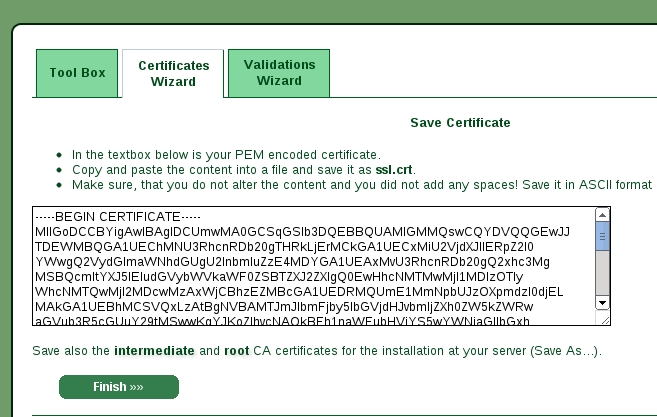
The last step is to donwload the root and intermediate certificates and place it
where your server can serve it (for an example of web server configuration with
nginx read the link at the end of the post).
Application in real life
Keep in mind that all this certificates stuff are used all over, for example when you develop applications for iPhone you have to sign your code with your own developer certificate issued from Apple and you have to download their root certificate and place it in your keychain. In the device should be present a root certificate that checks the signature on your code if it's authorized from Apple. A lot of problems could be avoided just with the right comprehension of the PKI.
Linkography
Here some links where you can find more informations
- StartSSL FAQ
- OpenSSL command line HowTo
- setting up https with nginx
- CA Certificates tree
the amazing world of python: testing
Python is my primary language of choice when I want to program something (I'm also a fan of C but this is a sort of foolness of mine). Between the things that make me choose python there is the way it manages to make easy to maintain our code, in this case testing it.
I'm an advocate of TDD (test driven development) and I think that code without tests is a useless code and writing tests in python is simple as insert the description of API in the doctest string (this is a simplification of course).
Doctests
Let's start with a simple module with the definition of a function able to calculate the Fibonacci numbers:
 """
 This is the Fibonacci module. Here there is only a simple function
 the fib().

  >>> fib(10)
  55

 Since the implementation is a very simple one, don't try to calculate it
 for arguments greater than 1000 otherwise it could not return very soon.
 """

 def fib(n):
    """Return the n-th number of Fibonacci. n must be an integer
    greater than zero.

    >>> fib(1)
    1
    >>> fib(2)
    1
    >>> fib(12)
    144
    >>> fib(-4)
    Traceback (most recent call last):
        ...
    ValueError: n must be > 0
    >>> fib(10*3)
    832040
    """
    if n <= 0:
        raise ValueError("n must be > 0")

    if n == 1 or n == 2:
        return 1

    return fib(n - 1) + fib(n - 2)
If we save this in a file called fib.py we can call the module doctest on it by using the following command
$ python -m doctest fib.py
With this example nothing is printed in the terminal but it's not bad, only means that the tests passed with success. It's possible to add the option -v in order to obtain a summary of the running
 $ python -m doctest -v fib.py
 Trying:
    fib(10)
 Expecting:
    55
 ok
 Trying:
    fib(1)
 Expecting:
    1
 ok
 Trying:
    fib(2)
 Expecting:
    1
 ok
 Trying:
    fib(12)
 Expecting:
    144
 ok
 Trying:
    fib(-4)
 Expecting:
    Traceback (most recent call last):
        ...
    ValueError: n must be > 0
 ok
 Trying:
    fib(10*3)
 Expecting:
    832040
 ok
 2 items passed all tests:
   1 tests in fib
   5 tests in fib.fib
 6 tests in 2 items.
 6 passed and 0 failed.
 Test passed.
There are also a set of options
that indicate how manage the tests behaviour: for example in this case is possible to wrap the list content using two lines,
ignoring whitespaces and newlines with the option NORMALIZE_WHITESPACE:
 >>> a = list(xrange(20))
 >>> a # doctest: +NORMALIZE_WHITESPACE
 [0, 1, 2, 3, 4, 5, 6, 7, 8, 9,
 10, 11, 12, 13, 14, 15, 16, 17, 18, 19]
Asserts
A special mention for the assert
statement that permits to insert programmatic check in your program; if you have doubts in inserting
an assert or a raise you have to know that the assert s are removed when the python
interpreter is launched with optimization activated (i.e. with flag -O).
Furthemore, if you think is overkilling adding an assert that stop your code, you must note that is better to stop your program early with a known cause that have a not-so-obvious-bug in your code.
Test runner
The doctests are useful, but primarly for documentation purpouse (will be a post dedicated to it in the future), so is also possible to create more elaborate stuff using the unittest library; let's start with a simple example: suppose we have a piece of our web application that will build a select menu from some entries in a database and we want to know that this is done correctly
 import sqlite3
 import tempfile
 import os
 import unittest

 def build_select(dbname):
    """Build a HTML select with the entries in the database.

    Suppose that this method belongs to another module that you want to test
    """
    conn = sqlite3.connect(dbname)
    cursor = conn.cursor()

    options = "\n".join([
        u'<option value="%s">%s</option>' % (row[0], row[0],)
            for row in cursor.execute("SELECT nation from nations")])

    cursor.close()

    return "<select>%s</select>" % options

 class SelectTests(unittest.TestCase):
    def setUp(self):
        fd, self.db_path = tempfile.mkstemp()

        connection = sqlite3.connect(self.db_path)
        cursor = connection.cursor()

        cursor.execute("CREATE TABLE nations (nation)")
        nations = [
            ('Italy',),
            ('Spain',),
            ('Greece',),
        ]

        cursor.executemany('INSERT INTO nations VALUES (?)', nations)
        connection.commit()
        connection.close()

    def tearDown(self):
        os.remove(self.db_path)

    def test_nations(self):
        select = build_select(self.db_path)

        self.assertEqual(u'''<select><option value="Italy">Italy</option>
 <option value="Spain">Spain</option>
 <option value="Greece">Greece</option></select>''', select)
If we save the code above in the file named select_creation.py we can launch the test with the
following command
 $ python -m unittest -v select_creation
 test_nations (select_creation.SelectTests) ... ok

 ----------------------------------------------------------------------
 Ran 1 test in 0.228s

 OK
All the tests are searched in the methods which name starts with test that are subclasses
of unittest.TestCase; first of launch any test the method setUp is called in order to
prepare the environment for the tests (in the previous case we create a database with some entries
in it). Obviously there is a tearDown method used to clean up the environment.
It's possible to do more but I don't want to wrote a complete guide, refere to the documentation.
Mock
In some cases is useful to fake objects in order to test our code against external library or not static data (think about external web service not under your direct control).
A possibility is offered by the mock library; if we want to test a function using the output from the twitter API, would be great to avoid the network creating a fake response as in the following example
 import requests
 import unittest
 import simplejson


 def twitter_shit(tweetid):
    """Retrieve and elaborate a tweet

    """
    url = "https://api.twitter.com/1/statuses/show.json?id=%s" % tweetid
    response = requests.get(url)

    if response.status_code != 200:
        raise Exception("obtained %d from server" % response.status_code)

    json = simplejson.loads(response.text)

    return "%s: %s" % (json["user"]["screen_name"], json["text"],)

 class TwitterTests(unittest.TestCase):
    def test_twitter_shit(self):
        fake_tweet = """{"created_at":"Mon Oct 08 08:34:49 +0000 2012","id":255224718150492162,"id_str":"255224718150492162","text":"hello world","user":{"id":378779203,"screen_name":"user1"}}"""

        with mock.patch("requests.get") as mocked_get:
            mocked_get.return_value.status_code = 200
            mocked_get.return_value.text = fake_tweet

            response = twitter_shit("whatever")

            self.assertEqual(response, "user1: hello world")
In this case we simply patch with a context manager the
get() method to return a status code equal to 200 with
a predetermined text. At this point is easy to check that the response is parsed correctly.
This is not the only available library, use google to find them and report in the comments if you think there are alternatives :P.
Coverage
Not only the tests are important, but also how they are written and which lines of code will be executed: a test missing some branching point (roughly speaking one of an if condition) or some condition, is a test that gives false sense of security. For code more elaborated and complex that the fibonacci example (think for example to a Django project) we need to know exactly how our code is tested.
This is possible using the coverage module that will print a report indicating which lines of code are executed and which branch of execution are missing. Let's try to use this module: first of all install it
$ pip install coverage
Since with coverage we need to launch directly the tests (i.e. without the -m doctest command line option) we add the following lines at the bottom of fib.py
 if __name__ == "__main__":
    import doctest
    doctest.testmod()
(they simply launch the tests when we do ./fib.py) and execute the following command
$ coverage run ./fib.py
This will create a file named .coverage in the working directory. Now is possible to have a report relative to our test
 $ coverage report
 Name    Stmts   Miss  Cover
 ---------------------------
 fib        11      0   100%
If we want a real report with each line annotated is possible to create an HTML one using
$ coverage html
It's worth noting that is possible to use it with your django project following this instructions.
Remove files from history with filter-branch
Let's suppose we work on a project with a billion of files; at start we thought was fine versioning all of them so to not have problems, but after a while, since we have to share our work with others, we end with a repo of 1GB and more size that is not so nice to work with.
What to do? simple, use filter-branch: this command allows to modify the story of your repository,
change commit messages, authorship and, more surgically, remove files. In my case I want to maintain only
a subset of the original files so I started with obtaining all the files traced by git
$ git ls-files > to-remove.txt
Now I edit with my preferred editor (vim what else) the file obtained in order to remove the files
I want to maintain under versioning and launch the following dangerous command
$ git filter-branch --tree-filter 'cat /absolute/path/to/to-remove.txt | \
    xargs rm -f ' HEAD
It's important to note that this takes several minutes to complete (it depends on repository size and its history of course) so take a coffee meanwhile. The absolute path is necessary in order to avoid "not found" error messages.
When the process is completed the repository is checkout-ed in the new rewritten branch and the original HEAD
is referenced in the file .git/refs/original/refs/heads/master; if something went wrong read the original reference with
$ cat .git/refs/original/refs/heads/master
382f89ae33a875d83507b276f0550ae315e408e1
and checkout that and repeat.
linux: come trovare i file di log di un demone
Per risolvere situazioni problematiche su una macchina è necessario per prima cosa analizzare i log disponibili, ma in alcuni casi non si è sicuri quali siano i file utilizzati.
Su Linux è possibile utilizzare gli strumenti messi a disposizione dal
filesystem virtuale /proc: per esempio se vogliamo sapere quali file ha
aperto una istanza di apache2 possiamo usare la directory dei file descriptor
relativi al processo che ci interessa (in questo caso 1909)
 # tree -l /proc/1909/fd
 /proc/1909/fd
 ├── 0 -> /dev/null
 ├── 1 -> /dev/null
 ├── 2 -> /var/log/apache2/error.log
 ├── 3 -> socket:[1412228]
 ├── 4 -> socket:[1412229]
 ├── 5 -> pipe:[1412241]
 ├── 6 -> pipe:[1412241]
 ├── 7 -> /var/log/apache2/other_vhosts_access.log
 └── 8 -> /var/log/apache2/access.log
Così si scopre che lo stderr finisce in error log; per scoprire
effettivamente le caratteristiche dei socket e delle pipe è possibile fare una
ricerca più approfondita con il comando lsof(1) (di cui ne riporto solo una
porzione)
 # lsof -p 1909
 COMMAND  PID USER   FD   TYPE  DEVICE SIZE/OFF    NODE NAME
 ...
 apache2 1909 root    0r   CHR     1,3      0t0     550 /dev/null
 apache2 1909 root    1w   CHR     1,3      0t0     550 /dev/null
 apache2 1909 root    2w   REG     8,1      140 3164665 /var/log/apache2/error.log
 apache2 1909 root    3u  sock     0,6      0t0 1412228 can't identify protocol
 apache2 1909 root    4u  IPv6 1412229      0t0     TCP *:www (LISTEN)
 apache2 1909 root    5r  FIFO     0,8      0t0 1412241 pipe
 apache2 1909 root    6w  FIFO     0,8      0t0 1412241 pipe
 apache2 1909 root    7w   REG     8,1        0 3165100 /var/log/apache2/other_vhosts_access.log
 apache2 1909 root    8w   REG     8,1        0 3164641 /var/log/apache2/access.log
Sfortunatamente questo non esaurisce tutte le possibilità: il demone che si
occupa dei log di sistema è syslog (oppure rsyslog) e viene chiamato
solo quando si necessita e quindi non risulta un socket/file collegato da
apache2 ad esso; per scoprire se effettivamente lo chiama è possibile fare
una analisi statica del binario molto grezza
 # nm -D `which apache2` | grep log
         U __syslog_chk
 ...
          U openlog
openlog(3) è proprio la chiamata per aprire una connessione al logger di sistema.
linux: breve tutorial sull'initrd
Initrd è l'abbreviazione di init ial r am d isk, cioè un
filesystem da tenere in RAM usato da un sistema linux per effettuare un
boot completo.
Per capire il suo utilizzo bisogna prima fare una premessa: un kernel linux è
di tipo (semi-)monolitico, in pratica i driver per le periferiche sono interni
al kernel stesso: quindi per avere un kernel generale che funzioni su più
hardware possibile dovremmo compilarlo inserendo tutti i driver disponibili ma
facendo così renderemmo il kernel stesso molto pesante. Ci viene in aiuto il
fatto che questo OS non è completamente monolitico ma predispone la possibilità
di compilare i propri device driver anche come moduli, cioè come delle
speciali librerie da attivare al momento più opportuno tramite i comandi in
user space come modprobe.
Il problema è in parte risolto, in realtà solo spostato: i moduli sono file e
come tutti i file saranno presenti su un filesystem che per essere
opportunamente gestito dal kernel dovrà avere il necessario driver (sia per il
filesystem che per il controller SATA che per quello PCI) caricato;
proprio per evitare questo si utilizza un early userspace, cioè un filesystem
con tutti i moduli possibili da cui il kernel potrà caricare solo quelli
necessari.
Per capire effettivamente come funziona nel dettaglio è meglio fare una carrellata dei passaggi che linux esegue all'avvio:
- il booloader carica il kernel e l'initrd
- il kernel converte initrd in un normale disco
RAMe libera la memoria prima occupata da questo - se non indicato diversamente viene usata come root device
/dev/ram0che corrisponde proprio ad initrd - /init viene eseguito (a meno che non si passi l'opzione
rdinitcon un eseguibile alternativo) - init deve preoccuparsi di effettuare il mount del vero root file system utilizzando la chiamata di sistema
pivot_root - a questo punto init cerca /sbin/init nel nuovo filesystem e lo esegue completando la procedura di boot
Ovviamente nulla vieta di creare un initrd che semplicemente esegue una shell:
per esempio esiste la versione del net-installer di Debian per ARM che in
qualche mega di initrd ha tutto quello che serve per riuscire ad installare
un sistema funzionante su questa architettura.
È possibile utilizzare due tipologie di initrd
- un semplice archivio compresso
- un vero e proprio filesystem
mi occuperò solamente del primo caso in quanto è molto più semplice. L'archivio compresso è del tipo gestito dal comando cpio(1) e possiamo averne un esempio prendendo un initrd che probabilmente esiste già nel vostro sistema nella directory boot.
$ mkdir initrd && cd initrd
$ cat /boot/initrd.gz | gunzip | cpio -imd
52109 blocks
$ ls
bin  conf  etc  init  lib  run  sbin  scripts
come potete vedere dall'ultimo comando sono disponibili tutte le directory che ci aspetterebbe in un sistema. Inversamente per ricreare un initrd a partire dal contenuto di una directory basta eseguire
find . | cpio -H newc -o | gzip -n -9 > new-initrd.gz
Ma come crearsi un proprio early userspace? È disponibile nei sorgenti del
kernel linux un comando predisposto a questo scopo chiamato gen_init_cpio
nella directory usr/. Quello che segue è l'help
 $ usr/gen_init_cpio
 Usage:
    usr/gen_init_cpio [-t <timestamp>] <cpio_list>

 <cpio_list> is a file containing newline separated entries that
 describe the files to be included in the initramfs archive:

 # a comment
 file <name> <location> <mode> <uid> <gid> [<hard links>]
 dir <name> <mode> <uid> <gid>
 nod <name> <mode> <uid> <gid> <dev_type> <maj> <min>
 slink <name> <target> <mode> <uid> <gid>
 pipe <name> <mode> <uid> <gid>
 sock <name> <mode> <uid> <gid>

 <name>       name of the file/dir/nod/etc in the archive
 <location>   location of the file in the current filesystem
              expands shell variables quoted with ${}
 <target>     link target
 <mode>       mode/permissions of the file
 <uid>        user id (0=root)
 <gid>        group id (0=root)
 <dev_type>   device type (b=block, c=character)
 <maj>        major number of nod
 <min>        minor number of nod
 <hard links> space separated list of other links to file

 example:
 # A simple initramfs
 dir /dev 0755 0 0
 nod /dev/console 0600 0 0 c 5 1
 dir /root 0700 0 0
 dir /sbin 0755 0 0
 file /sbin/kinit /usr/src/klibc/kinit/kinit 0755 0 0

 <timestamp> is time in seconds since Epoch that will be used
 as mtime for symlinks, special files and directories. The default
 is to use the current time for these entries.
Nel mio caso specifico ho utilizzato questi file
 $ cat cpio.conf
 # A simple initramfs
 dir /dev 0755 0 0
 nod /dev/console 0600 0 0 c 5 1
 dir /root 0700 0 0
 dir /sbin 0755 0 0
 dir /bin 0755 0 0
 file /init /pandora/raspberrypi/init-debian-arm.sh 0755 0 0
 file /sbin/busybox /opt/busybox/busybox 0755 0 0
 slink /bin/sh /sbin/busybox 0755 0 0
 slink /sbin/chroot /sbin/busybox 0755 0 0
 slink /sbin/mount /sbin/busybox 0755 0 0
 slink /bin/mkdir /sbin/busybox 0755 0 0
 slink /bin/ls /sbin/busybox 0755 0 0
 $ cat init-debian-arm.sh
 #!/bin/sh

 echo "Loading, please wait..."

 [ -d /dev ] || mkdir -m 0755 /dev
 [ -d /root ] || mkdir -m 0700 /root
 [ -d /sys ] || mkdir /sys
 [ -d /proc ] || mkdir /proc
 [ -d /tmp ] || mkdir /tmp
 mkdir -p /var/lock
 mount -t sysfs -o nodev,noexec,nosuid sysfs /sys
 mount -t proc -o nodev,noexec,nosuid proc /proc

 # Note that this only becomes /dev on the real filesystem if udev's scripts
 # are used; which they will be, but it's worth pointing out
 tmpfs_size="10M"
 if [ -e /etc/udev/udev.conf ]; then
    . /etc/udev/udev.conf
 fi
 if ! mount -t devtmpfs -o mode=0755 udev /dev; then
    echo "W: devtmpfs not available, falling back to tmpfs for /dev"
    mount -t tmpfs -o size=$tmpfs_size,mode=0755 udev /dev
    [ -e /dev/console ] || mknod -m 0600 /dev/console c 5 1
    [ -e /dev/null ] || mknod /dev/null c 1 3
 fi
 mkdir /dev/pts
 mount -t devpts -o noexec,nosuid,gid=5,mode=0620 devpts /dev/pts || true
 mount -t tmpfs -o "nosuid,size=20%,mode=0755" tmpfs /run

 ls /dev

 rootmnt=/root
 init=/sbin/init

 mount -t ext4 /dev/sda ${rootmnt}

 # Chain to real filesystem
 exec chroot ${rootmnt} ${init} <${rootmnt}/dev/console >${rootmnt}/dev/console
 echo "Could not execute run-init."
(questo ultimo è il nostro init ispirato da quello presente nel sistema
Debian che ha hardcodato il fatto che la root è /dev/sda e il device ha un
filesystem ext4) e ho generato l'archivio con il comando
$ /usr/src/linux-2.6/usr/gen_init_cpio cpio.conf | gzip -9 -n > new-initrd.gz
Da tenere conto che siccome l'initrd deve avere delle funzionalità di base non
è necessario utilizzare le glibc ma il più delle volte si preferisce la
leggerezza di librerie alternative come per esempio busybox che in un unico eseguibile (compilato staticamente)
mette a disposizione tutti i maggiori comandi *NIX.
Per provare effettivamente l'initrd così generato è possibile utilizzare qemu
$ qemu-system-i386 -kernel bzImage -initrd new-initrd.gz -hda hd.img
e se tutto va bene dovreste vedere la procedura di boot avvenire correttamente.
Ovviamente se volete saperne di più vi consiglio di leggervi i file nei
sorgenti di linux, in particolare
Documentation/filesystems/ramfs-rootfs-initramfs.txt e
Documentation/initrd.txt.